Overview
Ever wanted to securely connect to another machine without needing to use a VPN? Now you can! Nebula is a pretty exciting little networking project which has been used internally at slack for over 2 years. It is a ‘global network overlay’ which means it can bring differrent machines on different networks together and present them on a virtual LAN/subnet so they can all see each other (more detail below). It is now open sourced and available on github – https://github.com/slackhq/nebula
I have to thank the Linux Unplugged podcast for mentioning it on their latest episode. I had no idea an ‘overlay network’ existed or why I would ever want to use one! But, it does seem quite handy so I will dig into it a little. Note, I am not an expert on any of this but I thought it worth post. Here is their podcast episode link so you can learn more about it – https://linuxunplugged.com/329
There is also a medium post where the creators explain the rationale behind its creation – https://slack.engineering/introducing-nebula-the-open-source-global-overlay-network-from-slack-884110a5579
Basic Goal
I have a slightly contrived setup just to show how I am currently using this. I will setup a local linux home machine as a dedicated lighthouse/node and an Azure Windows VM as a node. The end goal is that I should be able to power on this VM when out of my house, RDP to it and then use it to remotely connect to my home via an ssh tunnel (ie another windows VM by RDP).
Setup Requirements
There are only three real requirements;
- We need a publicly accessible ‘lighthouse’ machine which essentially keeps track of who is on the network and their ip address. This can also double as ‘normal’ node on the network as far as I can tell which is handy.
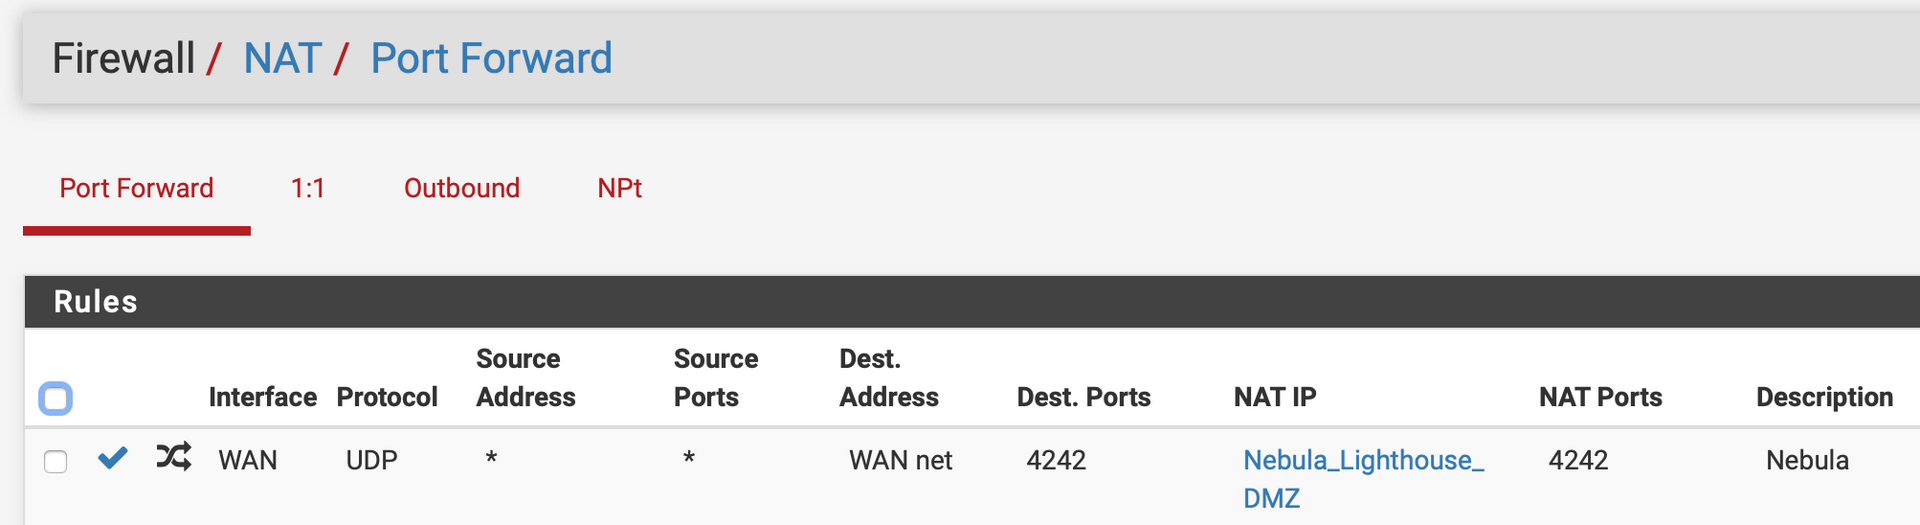
- Port UDP 4242 must be open on the host (ie an azure NSG rule allows traffic or a port forward is set to the host if behind a home router).
- We create a certificate for each node we add
Once everything is setup you can then use the virtual ip as the address for whatever you like and all traffic is routed over the udp port invisibly for you. So, access https, ssh etc on each node as though it were local. Magical!
Installation
This looks way worse than it actually is. After doing once you can do it from scratch in 5 minutes.
We shall decide to use 192.168.255.0/24 as our virtual subnet. Ensure in real life this doesnt overlap with anything used on any other networks you want to bring together, for obvious reasons!
Lighthouse Box Setup (Linux)
Files
I’m using Ubuntu 18.04 but any distro should work. Download and untar the release to get these two files. Put them into a folder called ‘nebula’ in your home folder
https://github.com/slackhq/nebula/releases/download/v1.0.0/nebula-linux-amd64.tar.gz
Remember and do a;
chmod +x nebula*
Certificate Generation
We must first generate a certificate file like so;
./nebula-cert ca -name 'Your Org Name'
This creates a ca.key and ca.crt file. Do not let the ca.key file loose on the internet! Keep it secure. This is the holiest of holies.
Then we need to pre-create a couple of certificates for the two nodes we plan to add.
./nebula-cert sign -name "lighthouse" -ip "192.168.255.1/24"
./nebula-cert sign -name "azure-windows-vm" -ip "192.168.255.10/24"`
You should get a couple of files for each with those names with a crt and key extension.
Linux Node/Lighthouse Setup
We have to now configure and run the service. Because this is also the lighthouse it is a little different, but only slightly for a couple of lines.
Copy the example config.yaml file from github and tweak these lines to make sure it is valid. We essentially, make sure key location os correct, flag that this is a lighthouse node and allow ‘all’ inbound traffic ither than ‘icmp’ as in their example config.yaml file. Also, going forward the examples show my home folder as /home/iain/nebula. You obviously want to change that for you own folder. And put in your own external IP in the static_host_map section. Use www.whatismyip.com from the lighthouse box to get that if unsure.
# The CAs that are accepted by this node. Must contain one or more certificates created by 'nebula-cert ca'
ca: /home/iain/nebula/ca.crt
cert: /home/iain/nebula/lighthouse.crt
key: /home/iain/nebula/lighthouse.key

...

# Example, if your lighthouse has the nebula IP of 192.168.100.1 and has the real ip address of 100.64.22.11 and runs on port 4242:
static_host_map:
  "192.168.255.1": ["my.internet.address.whatismyip:4242"]

...

lighthouse:
  # am_lighthouse is used to enable lighthouse functionality for a node. This should ONLY be true on nodes
  # you have configured to be lighthouses in your network
  am_lighthouse: true
  ...
  # IMPORTANT: THIS SHOULD BE EMPTY ON LIGHTHOUSE NODES
  #hosts:
  #  - "192.168.255.1"

...

  inbound:
    # Allow any between any nebula hosts
    - port: any
      proto: any
      host: any
Okay, almost there… Now we run it.
sudo ./nebula -config config.yaml
If it just sits there then we are good.
INFO[0000] Firewall rule added                           firewallRule="map[caName: caSha: direction:outgoing endPort:0 groups:[] host:any ip:<nil> proto:0 startPort:0]"
INFO[0000] Firewall rule added                           firewallRule="map[caName: caSha: direction:incoming endPort:0 groups:[] host:any ip:<nil> proto:0 startPort:0]"
INFO[0000] Firewall rule added                           firewallRule="map[caName: caSha: direction:incoming endPort:443 groups:[laptop home] host: ip:<nil> proto:6 startPort:443]"
INFO[0000] Firewall started                              firewallHash=7f575bbec56ca8fa6eb9318659edfa5bfa68ccbd046e7a6225b4047adad5cae0
INFO[0000] Main HostMap created                          network=192.168.255.1/24 preferredRanges="[]"
INFO[0000] UDP hole punching enabled
INFO[0000] Nebula interface is active                    build=1.0.0 interface=nebula1 network=192.168.255.1/24
If you want to run it as a service (tested on Ubuntu 18.04 only, by me) create this file;
sudo nano /etc/systemd/system/nebula.service
And paste in this. Ensure you update the ExecStart location with your nebula folder.
[Unit]
Description=nebula
Wants=basic.target
After=basic.target network.target

[Service]
SyslogIdentifier=nebula
StandardOutput=syslog
StandardError=syslog
ExecReload=/bin/kill -HUP $MAINPID
ExecStart=/home/iain/nebula/nebula -config /home/iain/nebula/config.yaml
Restart=always

[Install]
WantedBy=multi-user.target
Then enable and start. I do recommend running manually as a test then creating a service once happy though.
sudo systemctl start nebula
sudo systemctl enable nebula
sudo systemctl status nebula
Happy days! Be sure to setup the firewall on your home network to allow UDP 4242 traffic. This is a screenshot from my pfSense router.
Now to our windows node…
Windows Node Setup
Grab this file and extract to c:\Nebula (use 7zip if you dont know how to extract tars on windows) – https://github.com/slackhq/nebula/releases/download/v1.0.0/nebula-windows-amd64.tar.gz
We also need this TAP driver currently, so install this – https://build.openvpn.net/downloads/releases/tap-windows-9.9.2_3.exe
Then, copy the ca.crt, azure-windows-vm.crt and azure-windows-vm.key files we created earlier to c:\Nebula also.
All we need now is a config file. Get the example config.yaml again and tweak like before but with these changes;
# The CAs that are accepted by this node. Must contain one or more certificates created by 'nebula-cert ca'
ca: c:\nebula\ca.crt
cert: c:\nebula\azure-windows-vm.crt
key: c:\nebula\azure-windows-vm.key

...

# Example, if your lighthouse has the nebula IP of 192.168.100.1 and has the real ip address of 100.64.22.11 and runs on port 4242:
static_host_map:
  "192.168.255.1": ["my.internet.address.whatismyip:4242"]

...

lighthouse:
  # am_lighthouse is used to enable lighthouse functionality for a node. This should ONLY be true on nodes
  # you have configured to be lighthouses in your network
  am_lighthouse: false
  ...
  # IMPORTANT: THIS SHOULD BE EMPTY ON LIGHTHOUSE NODES
  hosts:
    - "192.168.255.1"

...

  inbound:
    # Allow any between any nebula hosts
    - port: any
      proto: any
      host: any
And we should have a working config. Run as we did on Linux and there should be a succesful handshake to our lighthouse (last line).
C:\Nebula>nebula.exe -config config.yaml
time="2019-11-30T08:33:57Z" level=info msg="Firewall rule added" firewallRule="map[caName: caSha: direction:outgoing endPort:0 groups:[] host:any ip:<nil> proto:0 startPort:0]"
time="2019-11-30T08:33:57Z" level=info msg="Firewall rule added" firewallRule="map[caName: caSha: direction:incoming endPort:0 groups:[] host:any ip:<nil> proto:0 startPort:0]"
time="2019-11-30T08:33:57Z" level=info msg="Firewall rule added" firewallRule="map[caName: caSha: direction:incoming endPort:443 groups:[laptop home] host: ip:<nil> proto:6 startPort:443]"
time="2019-11-30T08:33:57Z" level=info msg="Firewall started" firewallHash=7f575bbec56ca8fa6eb9318659edfa5bfa68ccbd046e7a6225b4047adad5cae0
time="2019-11-30T08:33:57Z" level=info msg="Main HostMap created" network=192.168.255.10/24 preferredRanges="[]"
time="2019-11-30T08:33:57Z" level=info msg="UDP hole punching enabled"
time="2019-11-30T08:33:57Z" level=info msg="Handshake message sent" handshake="map[stage:1 style:ix_psk0]" initiatorIndex=4261561494 remoteIndex=0 udpAddr="your-ext-ip:4242" vpnIp=192.168.255.1
time="2019-11-30T08:33:57Z" level=info msg="Nebula interface is active" build=1.0.0 interface="Ethernet 2" network=192.168.255.10/24
time="2019-11-30T08:33:57Z" level=info msg="Handshake message received" durationNs=324031300 handshake="map[stage:2 style:ix_psk0]" initiatorIndex=4261561494 remoteIndex=4261561494 responderIndex=1434342704 udpAddr="your-ext-ip:4242" vpnIp=192.168.255.1
We should have a new network interface on the machine
ipconfig /all

  Ethernet adapter Ethernet 2:

     Connection-specific DNS Suffix  . :
     Description . . . . . . . . . . . : TAP-Windows Adapter V9
     Physical Address. . . . . . . . . : 00-FF-4E-66-0A-F8
     DHCP Enabled. . . . . . . . . . . : No
     Autoconfiguration Enabled . . . . : Yes
     Link-local IPv6 Address . . . . . : fe80::383f:7b72:e6a:1439%10(Preferred)
     IPv4 Address. . . . . . . . . . . : 192.168.255.10(Preferred)
     Subnet Mask . . . . . . . . . . . : 255.255.255.0
     Default Gateway . . . . . . . . . :
     DHCPv6 IAID . . . . . . . . . . . : 604045134
     DHCPv6 Client DUID. . . . . . . . : 00-01-00-01-24-1A-3C-9A-00-0D-3A-B4-28-FB
     DNS Servers . . . . . . . . . . . : fec0:0:0:ffff::1%1
                                         fec0:0:0:ffff::2%1
                                         fec0:0:0:ffff::3%1
     NetBIOS over Tcpip. . . . . . . . : Enabled
Now, we try and ping between hosts. If the ports are open it should succeed! (Note that the reverse ping should work too, from 192.168.255.10 to this vm)
C:\Users\azureuser>ping 192.168.255.1

Pinging 192.168.255.1 with 32 bytes of data:
Reply from 192.168.255.1: bytes=32 time=15ms TTL=64
Like linux, it is best we set this up as a service. We can then use nssm. Download from here, unzip and place nssm.exe in the c:\nebula folder.
https://nssm.cc/release/nssm-2.24.zip
Then run;
nssm.exe install Nebula /s
nssm.exe set Nebula Application C:\nebula\nebula.exe
nssm.exe set Nebula AppDirectory C:\nebula
nssm.exe set Nebula AppParameters -config config.yaml
sc start nebula
Be sure your firewall allows UDP 4242 traffic. This is the NSG on my Azure VM

RDP to an internal VM
Now we can put all this together and rdp to our home network from this azure vm by using mobazterm and an ssh tunnel. We are doing this from our remote, off network Azure Windows VM and using mobaxterm for simplicity – https://mobaxterm.mobatek.net/
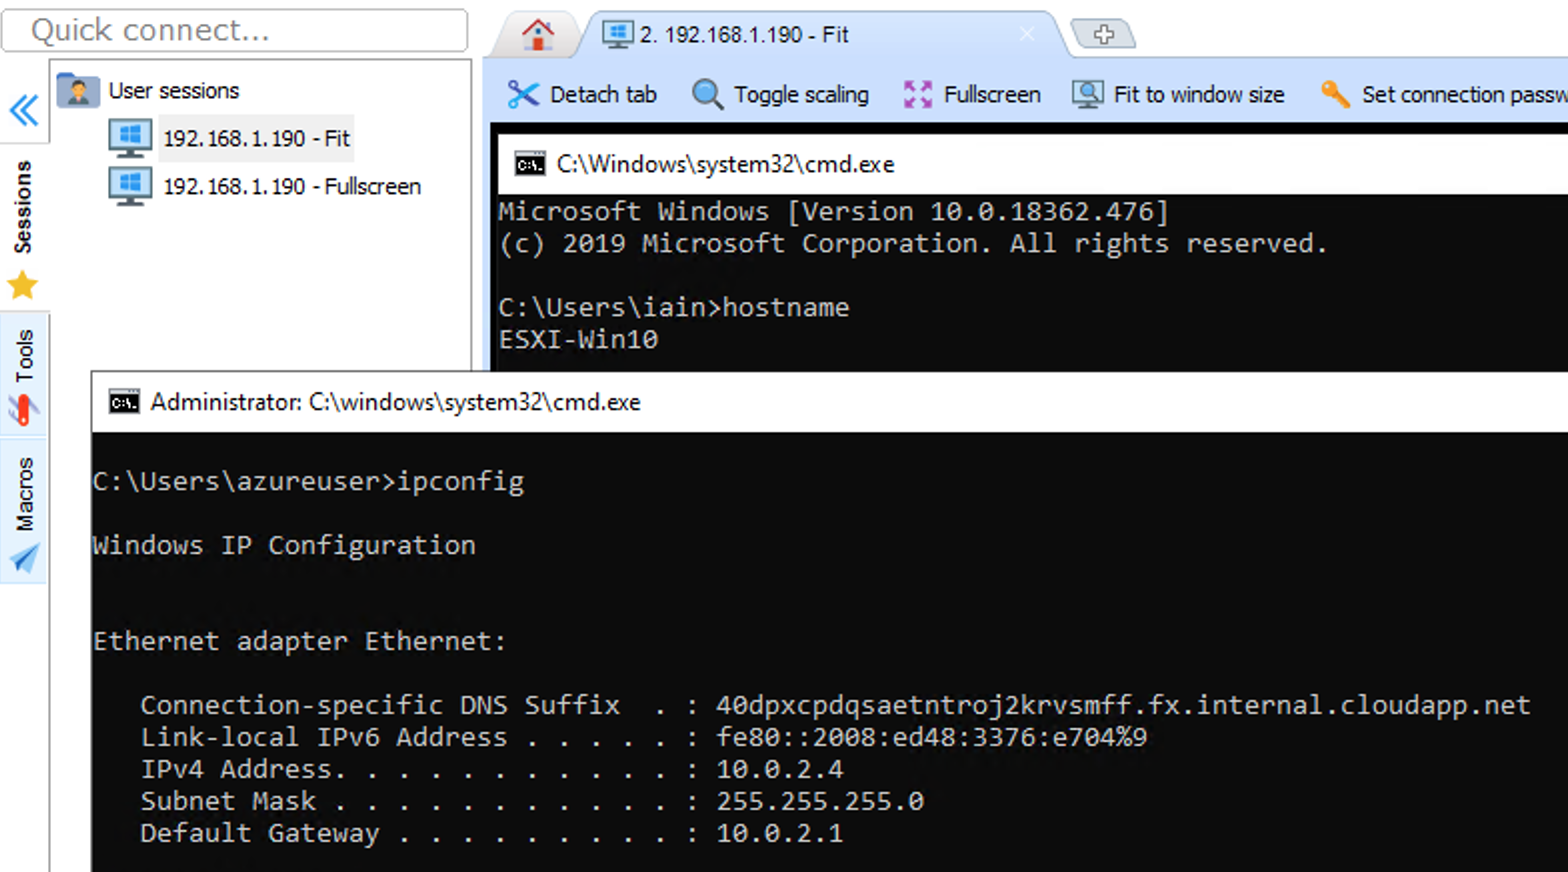
Create an RDP session and point it to something internal to your network you want to connect to. In my case 192.168.1.190 is a test windows VM I use.
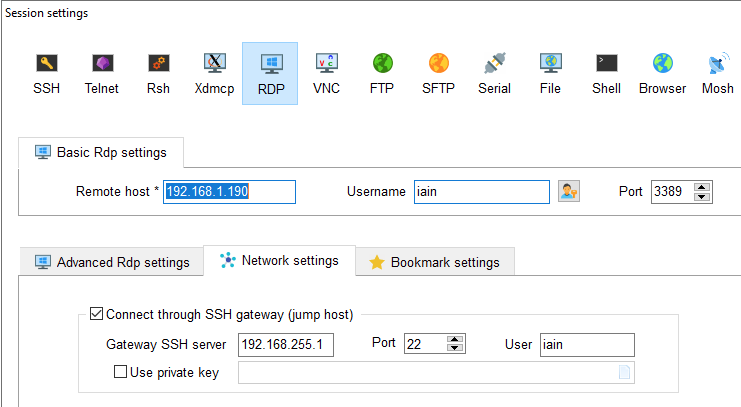
Then connect (authenticate the lighthouse SSH then the Windows RDP). This screenshot hopefully shows that I am on a remote machine and connected into my local VM inside my home network. Without a VPN. Cool!
Pros and Cons
There are some caveats to this approach.
Pros
- Quite simple to setup. Adding another host is just creating a certificate and installing a service on the next host. Simpler than a VPN.
- Very secure. I dont mind exposing my internet to the 4242 UDP port as traffic has to bypass a certificate challenge for network access (should be impossible) and then the local machine auth to login to the machine. Seems a pretty tough barrier.
- Performance should be better than a VPN though I havent verified.
Cons
- With a VPN I can access ALL hosts in my connected subnet, not just one. If you use nebula, you only get one host as a port forward so it more useful for creating jump boxes to other networks. You could add more hosts and incremenet the listening/port forwards if you really needed to though (4243, 4244 etc…)
Edit: Dave Bundy at The Jupiter Broadcasting telegram channel suggested that an ip_forward on the gateway machine might open up the whole subnet. Not tested, but might/should work if you know what you’re doing. - Lack of OSX and mobile support. Though it is coming I hear.
- Installing the service is fiddly on windows. An installer which includes the TAP driver and a service installer would be nice.