So, if you want to run a full Windows instance on Kubernetes, you face a challenge. You could follow this guide on Running Windows VMs in Kubernetes with Kubevirt I did previously with Kubevirt. Or you could try Dockur instead. Dockur makes things quite a lot easier because it basically runs KVM inside docker to virtualise it on the hardware. Think of it as a docker container running virtualbox and just dumping a big disk on it. Amazingly, it can do all this for you from some environment values;
- Choose OS Edition (from very Windows 2003 to Windows 2025)
- Choose Language (this is usually a massive pain to change later, so this is great!)
- Install software post boot via an
install.batfile
How to Run this in MicroK8S
The project itself gives examples of using Docker, a Docker Compose file, or a Kubernetes file. It will download an ISO file, create the VM image, and then give you a nice WebUI to watch the installation. Afterwards you can RDP to it just like a normal windows machine.
But, it really is truly useful on Kubernetes, where with some autoscaling, it should allow the creation of more and more machines as required. To be honest upfront though, I haven’t tested that, but I can show how to set it up in MicroK8S and then you can take that experience to a cloud provider and see how you get on making it a more thorough implementation for on-demand instances.
Hardware Specs and Installation
We need an Ubuntu 24.04 instance to get started, Windows is a heavy OS on CPU, RAM and Disk, so when creating the host make sure you ideally have 4 CPU, 16GB RAM and 256GB disk. I virtualised the VM on a proxmox host for simplicity.
KVM
All of this is for nothing if KVM isn’t supported on your host machine, so check that it is first.
sudo apt update && sudo apt install cpu-checker -y
sudo kvm-ok
You should get a reply like this, otherwise, google is your friend!
INFO: /dev/kvm exists
KVM acceleration can be used
Docker and MicroK8S
We need Docker installed for building an initial image, and then MicroK8S to host the whole thing.
# Install and Setup Docker
sudo apt install docker.io -y
sudo addgroup --system docker
sudo adduser $USER docker
newgrp docker
# Install and Setup MicroK8S
sudo snap install microk8s --classic
sudo snap alias microk8s.kubectl kubectl
sudo usermod -a -G microk8s iain
newgrp microk8s
MicroK8s Addons
We need a few addons as well.
Storage
Enable Storage so we can use PVCs on the local file system.
microk8s enable storage
microk8s stop; microk8s start
MetalLB
MetalLB is a way to let MicroK8S use an IP from your LAN and setup it’s own kind of DHCP server to assign them. You can maybe skip this, but I found that port redirection to the Web Interface on port 8006 seems very sensitive. This helps make sure that each instance is accessible almost natively on your LAN.
Make sure to pick a range on your network that you know isn’t assigned by your DHCP router (reduce it’s scope if required). In my case it can just handing out 6 IPs near the end of my range.
microk8s enable metallb:192.168.1.190-192.168.1.195
Local Registry
I have bad internet, and the native way of doing this involves the Dockur container pulling an ISO from Microsoft on each build. Luckily, we can override that and provide an ISO it can use instead. But, when you are talking about K8S that gets a bit trickier to manage where that image lives inside the cluster. So, the easiest thing to do is just build an image with the ISO baked onto it. And if we create a local registry then it will be super simple, and MicroK8S supports this. So create that like so. I’ve made it 50GB in size as we may have a few images over time.
microk8s enable registry:size=50Gi
We have to make a small change on our docker daemon to allow it to use this insecure registry though, so do the following
sudo mkdir -p /etc/docker
sudo tee /etc/docker/daemon.json <<EOF
{
  "insecure-registries": ["localhost:32000", "127.0.0.1:32000"]
}
EOF
sudo systemctl restart docker
Windows 2025 Docker Image
Now we can create a Windows 2025 image in Docker and load it in MicroK8S.
On your host machine make a folder for the Windows 2025 image.
mkdir -p dockur/windows2025
cd dockur/windows2025
Then, copy a Windows 2025 ISO to it and call it boot.iso (there are links here: https://github.com/dockur/windows/blob/master/src/define.sh)
And make a Dockerfile with this in it
FROM docker.io/dockurr/windows
COPY boot.iso /boot.iso
And build and push it to our local registry
docker build . -t localhost:32000/dockur-windows:2025
docker push localhost:32000/dockur-windows:2025
We now have a Docker Image with the ISO we need baked right into it.
MicroK8S Deployment
And now we can create a YAML file called deployment.yaml for MicroK8S and apply it. This will create a namsepace, PVC, Service and a Deployment. It is tuned to deploy from our local registry and assume MetalLB is in place. You can see their reference one if you want a more basic deployment: https://raw.githubusercontent.com/dockur/windows/refs/heads/master/kubernetes.yml
---
apiVersion: v1
kind: Namespace
metadata:
  name: dockur
---
apiVersion: apps/v1
kind: Deployment
metadata:
  name: windows-2025
  namespace: dockur
  labels:
    name: windows
spec:
  replicas: 1
  selector:
    matchLabels:
      app: windows
  template:
    metadata:
      labels:
        app: windows
    spec:
      containers:
      - name: windows
        image: localhost:32000/dockur-windows:2025
        env:
        - name: DISK_SIZE
          value: "64G"
        - name: VERSION
          value: "2025"
        resources:
          requests:
            cpu: "2"
            memory: "8Gi"
          limits:
            cpu: "2"
            memory: "16Gi"
        ports:
          - containerPort: 8006
            name: http
            protocol: TCP
          - containerPort: 3389
            name: rdp
            protocol: TCP
          - containerPort: 3389
            name: udp
            protocol: UDP
          - containerPort: 5900
            name: vnc
            protocol: TCP
        securityContext:
          capabilities:
            add:
            - NET_ADMIN
          privileged: true
        volumeMounts:
        - mountPath: /storage
          name: storage
        - mountPath: /dev/kvm
          name: dev-kvm
        - mountPath: /dev/net/tun
          name: dev-tun
      terminationGracePeriodSeconds: 120
      volumes:
      - name: storage
        persistentVolumeClaim:
          claimName: windows-pvc
      - name: dev-kvm
        hostPath:
          path: /dev/kvm
      - name: dev-tun
        hostPath:
          path: /dev/net/tun
          type: CharDevice
---
apiVersion: v1
kind: PersistentVolumeClaim
metadata:
  name: windows-pvc
  namespace: dockur
spec:
  accessModes:
    - ReadWriteOnce
  resources:
    requests:
      storage: 80Gi
---
apiVersion: v1
kind: Service
metadata:
  name: windows-lb
  namespace: dockur
spec:
  selector:
    app: windows
  type: LoadBalancer
  ports:
    - name: web
      protocol: TCP
      port: 8006
      targetPort: 8006

    - name: rdp-tcp
      protocol: TCP
      port: 3389
      targetPort: 3389

    - name: rdp-udp
      protocol: UDP
      port: 3389
      targetPort: 3389
Apply like so
microk8s kubectl apply -f deployment.yaml -n dockur
Then get the External IP MetalLB assigned it
microk8s kubectl get svc windows-lb -n dockur -w
NAME         TYPE           CLUSTER-IP       EXTERNAL-IP     PORT(S)                                        AGE
windows-lb   LoadBalancer   10.152.183.209   192.168.1.190   8006:30963/TCP,3389:31752/TCP,3389:31752/UDP   12s
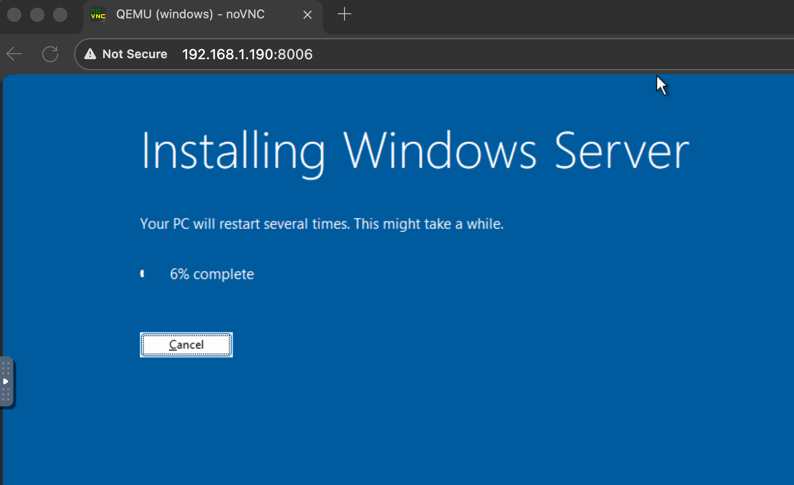
Go to the http address, like http://192.168.1.190:8006 and you should see a Windows VM automatically installing.
And that’s it. Create more windows docker images and deployment YAML files as required.
MOAR
Next steps could be;
- Make a CICD piepline to create these on demand from custom
deployment.yamlfiles - Look at adding an
install.batpost install file to try get WinRM working on boot. Then you can do whatever you like post-boot with Ansible, or powershell etc… - Test it on a large cloud provider and have it autoscale up and down as required
- Try and add extra disks via more PVC claims
I may try these myself, as the solution is such a good way to get a quick VM for a variety of OS’s. I may have some follow-up posts later…