Do you want a powerful server to run Proxmox on but don’t want to pay insane Azure prices for a 4 CPU 16GB RAM machine ($170!!!)? Keep reading.
Hetzner Dedicated Servers
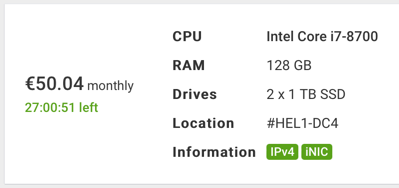
I’m not sure how many people have heard of them, but a company called Hetzner will sell you a dedicated server for silly money. I can get a i7-8700 12 core CPU, 128GB RAM (yes 128GB!) and 2 x 1TB SSD disks in RAID 1. For… 50 euros a month. Bargain. Granted it’s not the latest CPU, but its still very punchy. An equivalent machine to build is probably $1,000, and that doesn’t consider the electricity you would spend to run it, or the noise it would create. So there is real value here if you want that kind of power.
Hetzner Server Setup
Let’s talk through how to purchase one and setup Proxmox on it.
Hetzner Server Auctions
So, create an account and go here: https://www.hetzner.com/sb
Then have a look at the machines available. What you see are machines starting from $38 euros a month with generally an i7-4700 CPU and 32GB RAM.
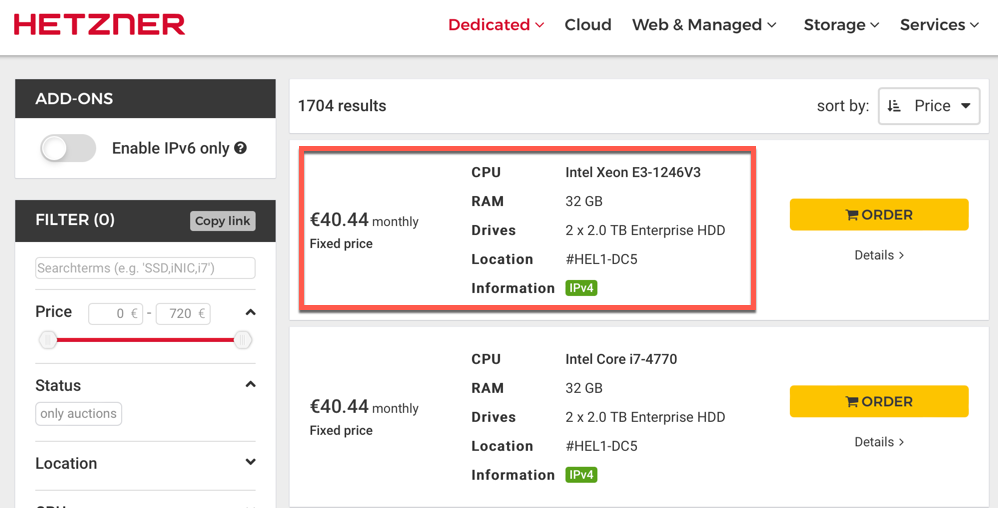
These are pretty respectable already compared to prices you would pay in Azure/AWS, but if we filter a little we can get something even more value for money. How about the spec I mentioned at the start, very nice!
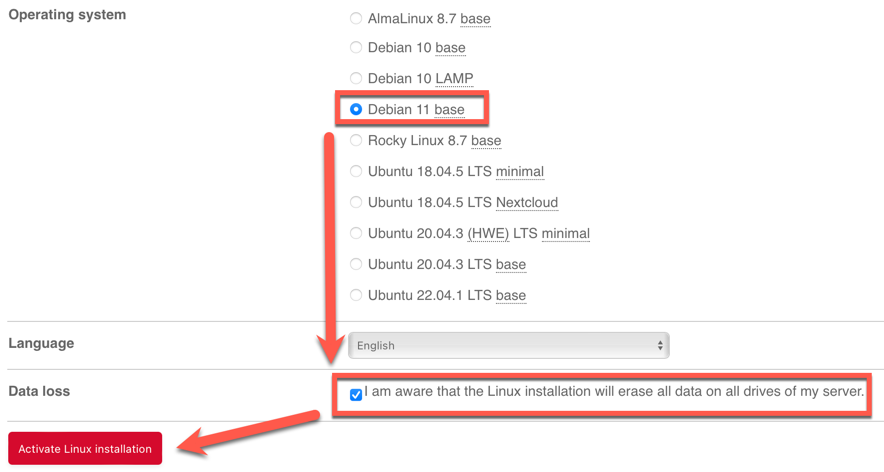
So, order that (just accept the terms, very simple) and then wait for it to process. You should then have a machine and the public IP address shown to you. We want to first reset it and install Debian Linux, so click the Server and go to the ‘Linux’ tab

Then choose Debian 11 and choose to reset the machine. Note the new password to use post-reboot is displayed, and also emailed when the process is complete.
To start the install of Debian, ssh into the machine using the previous login password you should have initially received via email, and reboot the machine. Use your server IP obviously.
ssh [email protected]

reboot
Then, in 5-10 minutes login with the new password once the setup has completed. Note, you may have to amend your .ssh/known_hosts file to remove the machines previous public key entry as it will think something odd is happening
Install Proxmox
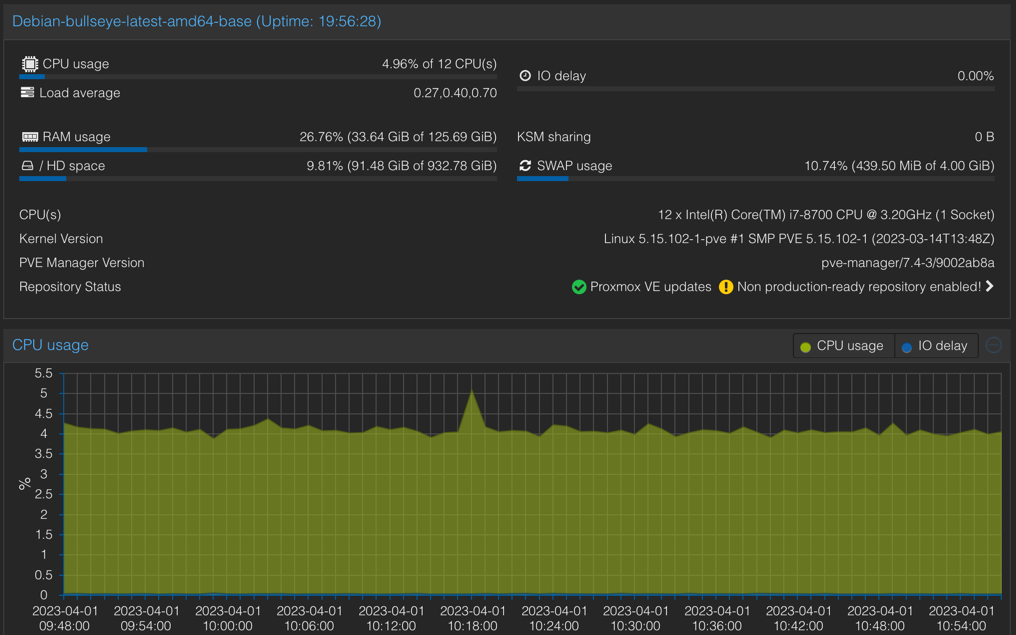
Once logged into the system, follow the guide below to install Proxmox, it is pretty straightforward. A couple tips though, I can’t quite remember if I added the host entry (/etc/hosts) or if Hetzner did it automatically for me. Mines has this as an example in case you are missing it.
65.21.123.123 Debian-bullseye-latest-amd64-base
Also, DONT create the network bridge as it suggests, stop once you have access to the Web UI at https://your-ip:8006. The login credentials are root and the root password. Feel free to change it to something else that is easier to type for login.
https://pve.proxmox.com/wiki/Install_Proxmox_VE_on_Debian_11_Bullseye
Setup the Community Proxmox Apt Sources
If you dont have a Proxmox subscription, be sure to change the apt sources list so we can receive the non enterprise updates. If you dont you will get this kind of error when you try and update the system
root@proxmox:~# apt update
Hit:1 http://security.debian.org bullseye-security InRelease
Hit:2 http://ftp.uk.debian.org/debian bullseye InRelease
Hit:3 http://ftp.uk.debian.org/debian bullseye-updates InRelease
Err:4 https://enterprise.proxmox.com/debian/pve bullseye InRelease
  401  Unauthorized [IP: xx.xx.xx.xx 443]
Reading package lists... Done
E: Failed to fetch https://enterprise.proxmox.com/debian/pve/dists/bullseye/InRelease  401  Unauthorized [IP: 51.91.38.34 443]
So, add this line to /etc/apt/sources.list
deb http://download.proxmox.com/debian/pve bullseye pve-no-subscription
And remove this (just comment it out from /etc/apt/sources.list.d/pve-enterprise.list)
#deb https://enterprise.proxmox.com/debian/pve bullseye pve-enterprise
Networking and DHCP Setup
Once we have Proxmox installed we are kind of done, and it will work just as expected. We have lots of CPU and RAM, and a nice big 1TB software RAID storage location to hosts VMs and ISOs. But, there are a few issues we need to solve due to the nature of the setup that you don’t get when you run Proxmox from home. The current problems are
- We have a public IP on the machine
- We dont have a DHCP server
- We dont have a local network for the VMs
This means we need to create a local network for the VMs to live in, and a DHCP server to hand out IPs.
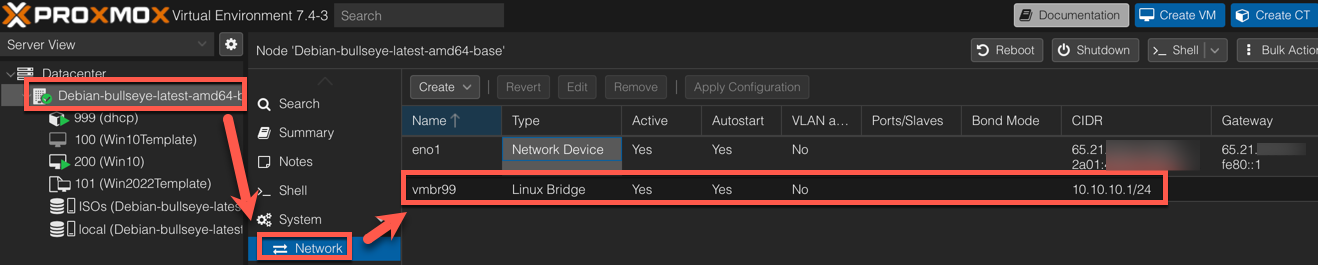
VM Bridge Network
Create a network bridge by editing /etc/network/interfaces. Make it look something like this to add a new 10.10.10.0/24 subnet for our VMs called vmbr99
source /etc/network/interfaces.d/*

auto lo
iface lo inet loopback

iface lo inet6 loopback

auto eno1
iface eno1 inet static
        address 65.21.xyz.xyz/26
        gateway 65.21.xyz.xyz
        up route add -net 65.21.xyz.xyz netmask 255.255.255.192 gw 65.21.xyz.xyz dev eno1

iface eno1 inet6 static
        address 2a01:xyz.xyz/64
        gateway fe80::1

### ADD THIS PART BELOW FOR OUR NEW BRIDGE. NOTE THE eno1 REFERENCE BELOW
### MAKE THIS MATCH YOUR INTERFACE NAME ABOVE AS IT MAY BE DIFFERENT

auto vmbr99
iface vmbr99 inet static
        address 10.10.10.1/24
        bridge-ports none
        bridge-stp off
        bridge-fd 0

    post-up   echo 1 > /proc/sys/net/ipv4/ip_forward
    post-up   iptables -t nat -A POSTROUTING -s '10.10.10.0/24' -o eno1 -j MASQUERADE
    post-down iptables -t nat -D POSTROUTING -s '10.10.10.0/24' -o eno1 -j MASQUERADE
    post-up   iptables -t raw -I PREROUTING -i fwbr+ -j CT --zone 1
    post-down iptables -t raw -D PREROUTING -i fwbr+ -j CT --zone 1
Then reboot the server. The bridge should appear afterward.
DHCP Setup
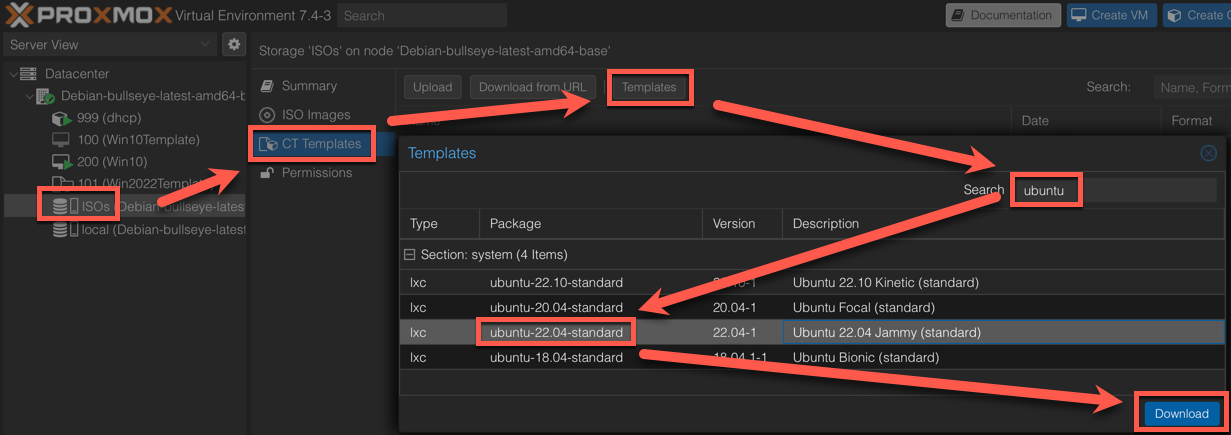
Now, lets make a DHCP server using an LXC Container in Proxmox.
We need to download the container template for Ubuntu 22.04 first like so (i made a new storage thing for mine, but choose ‘local’ in your setup)
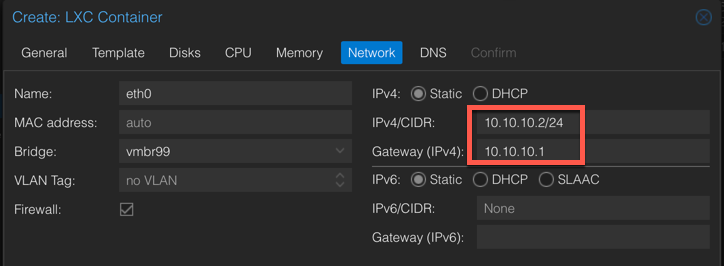
Then create a new Container with our Ubuntu 22.04 template. Choose ‘Create CT’ and use the defaults and make a machine with 8GB disk, 1 CPU and 128MB RAM. The most important setting is the networking, ensure we set a static IP of IP 10.10.10.2/24 and the gateway is set to 10.10.10.1 (the vmbr99 ip).
Once created, login to the container and install a DHCP server package.
apt update && apt upgrade -y
apt install isc-dhcp-server -y
Then we setup the DHCP config
nano /etc/dhcp/dhcpd.conf
And then put in the info below for a range of 10.10.10.10 - 10.10.10.199 (or whatever you want)
option domain-name-servers 8.8.8.8;
subnet 10.10.10.0 netmask 255.255.255.0 {
  range 10.10.10.10 10.10.10.199;
  option routers 10.10.10.1;
}
default-lease-time 600;
max-lease-time 7200;
ddns-update-style none;
And enable and restart the DHCP service.
systemctl enable isc-dhcp-server
systemctl restart isc-dhcp-server
Now, when you create a VM or container, simple choose to attach it to the vmbr99 network and use DHCP.
Hetzner Firewall and DNS
Now, one oddity of Hetzner is that the firewall rules are a bit bizarre. We need to allow access to DNS on 8.8.8.8 from their firewall. And also acks from 32768-65535 for internet traffic to work… And we probably want to stop internet wide access and only allow our own internet IP. So here is an example of what I have setup with some obfuscation of my IPs etc…

And that is us, enjoy your server. Here are some uses for it
- Install Nginx Reverse Proxy Manager on it and host lots of things - https://community.hetzner.com/tutorials/installing-nginx-proxy-manager
- Install Tailscale on the Debian host and access it from anywhere
- Install Docker on it and use it as a remote Docker Host
- Install a chunky Windows VM and install tailscale on that, then RDP from wherever to it