This post will be quite lengthy, but it will outline the starting steps on how to use Ansible to deploy resources on Azure from ansible, on a Windows machine. I discovered Ansible quite late on as it is Linux only, unlike Terraform. So, in this post we will walk through how to setup a Windows environment that we can use to run ansible and deploy to Azure. In doing so we will achieve the automation holy grail of having our Infrastructure as Code.
One question might be ‘What is Ansible and why use it?’. The best answer I have is that Ansible is a simple but powerful way to get started with Configuration Management of your Cloud Infrastructure in this use case, and it is also a very hot trend right now in lots of areas. Ansible is starting to really dominate the market. Terraform is also a contender for this job but it is more difficult to use well in my opinion, and the state file concept causes a few headaches that Ansible can simply circumvent. I won’t go too deep into it, but with Ansible we essentially declare a resource and tell Ansible we would like it created. Be it a VM, a disk, a software package installed on a Windows machine, you name it, ansible can likely do it. Terraform can also do this but it is more ‘enterprisey’ in scope and so can have some headaches around State files and refactoring exsting code can be difficult. Ansible is a jack of all trades, and while still rough, it is gaining a lot of traction as a good middle-ground for lots of purposes. This post gives a more detailed explanation https://www.whizlabs.com/blog/ansible-vs-terraform/
What We Will Be Doing
So, we will perform the following steps;
VM Setup
- Setup Docker
- Install VS Code
- Setup a Github Account (Optional)
Azure
- Create an Azure Account
- Create an Azure Service Principal
Ansible
- Create an Ansible Docker Container in VSCode
- Create our Ansible Playbook
- Deploy it
VM Setup
So, first thing is to get a Windows machine for developing on. As long as you are running a version of Windows 10 newer than 2018ish you should be fine.
Setup Docker
So, first thing is to setup Docker on your Windows machine. I’ll not rewrite a guide which will go out of date, so follow this link, but you need virtualization enabled in your BIOS as well, so be sure to do that first.
https://docs.docker.com/docker-for-windows/install/
Install VS Code
Install the ‘Stable’ VS Code from here - https://code.visualstudio.com
Setup a Github Account (Optional)
Now, optionally, setup a github account - https://github.com
It is optional, but you probably want to do this to track your code. This post is not a git tutorial as adding that content would complicate things too much. Feel free to do so yourself though.
Azure
Now, we need an Azure account. If you have one then great, if not, see the next step.
Create an Azure Account
We need an Azure account. Go here and sign up! Sorry, no instructions, I’m sure you will figure it out :) If worried about cost then look at a prepaid credit card or investigate cost limits in Azure.
Create an Azure Service Principal
We now need a way for the Ansible Playbook we create later to authenticate as ‘us’, but in a way that Ansible can understand. The easiest way to do this is to create what is called a ‘Service Principal’. It’s like an API key with permissions to Azure. The key point is to NEVER EVER NEVER store the values for this in github in a public repo (or even a private one). It is essentially a way to access an Azure account for free and have someone else foot the bill. Be careful if using GitHub and pushing your code. The code we write later will load our credentials at runtime to avoid this.
To get a ‘Service Principal’ login to your Azure Account at https://portal.azure.com
Then, go to the ‘Azure Active Directory’ resource and choose to create a ‘New registration’ (I had to blur some existing ones I have, your list will be empty if you are using a new account).
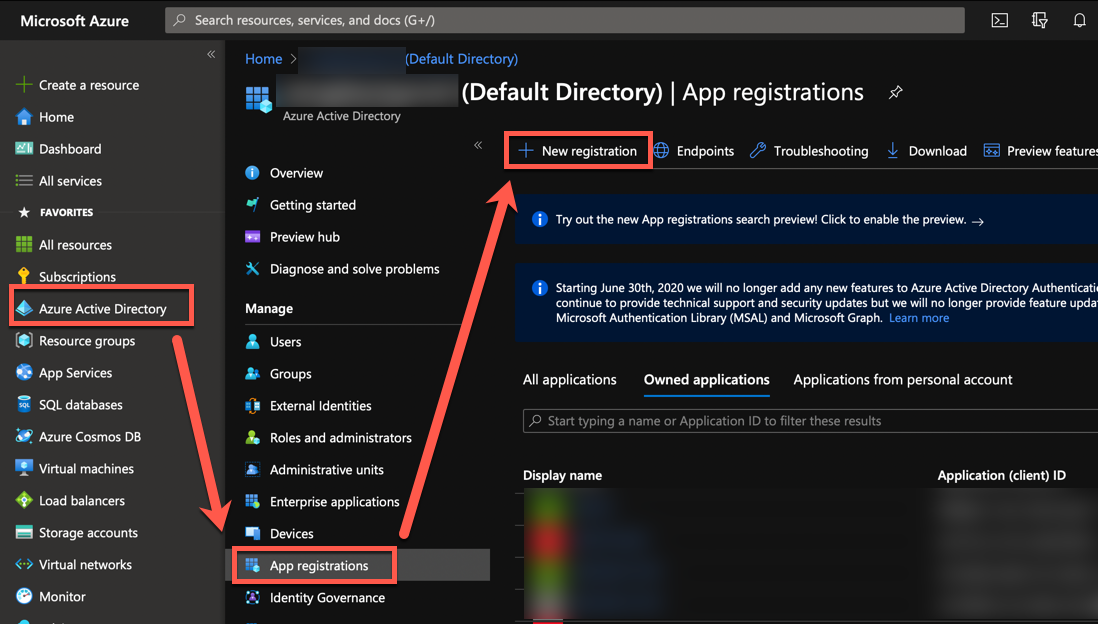
Call it something sensible like ‘Ansible-Automation’ and click ‘Register’.

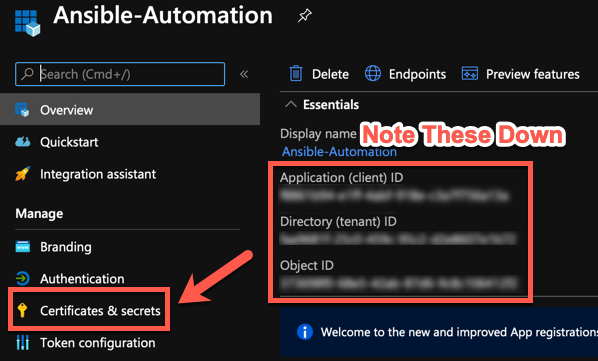
Now, we will have a ‘Service Principal’ created. Note down the 3 items highlighted (not in a file Git tracks though!).
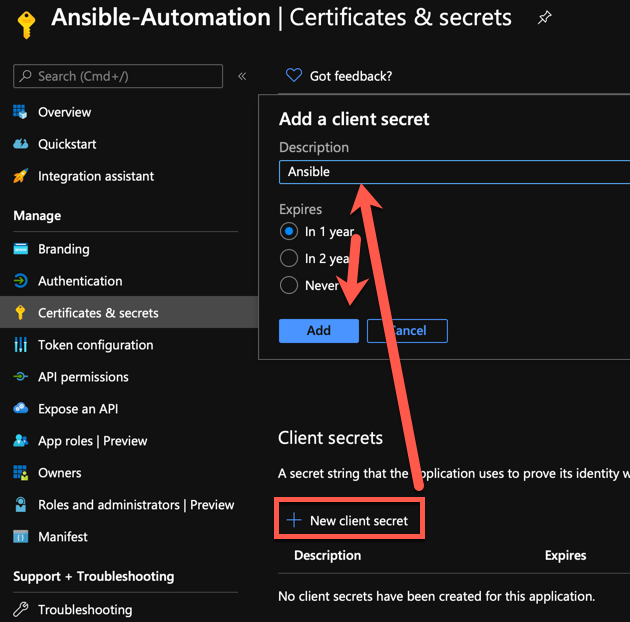
Then, click ‘Certificates & secrets’ and choose ‘New client secret’ and add a name and a duration (a year is recommended just so you protect yourself slightly from forgetting about it and if it ever somehow gets leaked into the wild. Choose never expires with caution!)
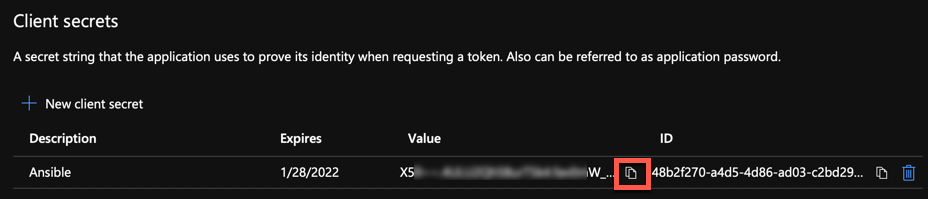
Then, you get one chance to record the secret, so click the little clipboard icon and copy/paste somewhere and save it (again, definitely not in git!)
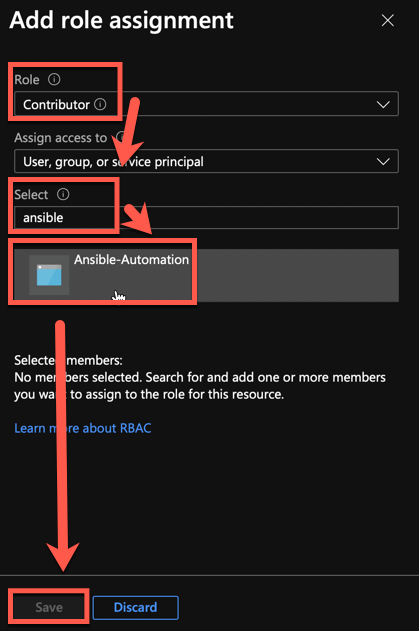
The Service Principal is now created, but it has no permissions. Let’s give it ‘Contributor’ access to the subscription. Contributor is a powerful level of access which allows the creation of any resource, but not the ability to change permissions in Azure. It’s about as good as it gets for someone to create resources though, so again, keep all this information secret and out of git ;)
Go to your subscription and choose ‘Access Control (IAM)’ and click ‘Add’.
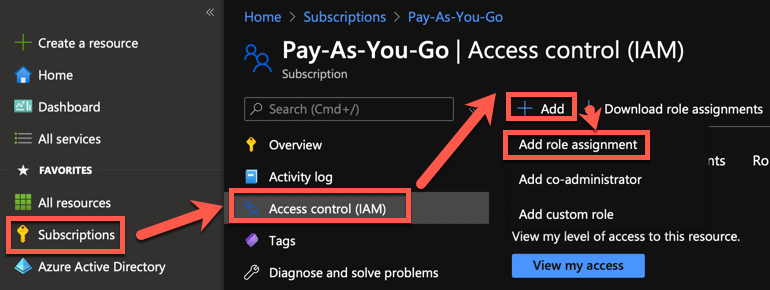
Then add our ‘Service Principal’ and give it a ‘Contributor’ role as explained above. Hit save, and we are done!
Just make sure you have all 4 pieces of information handy about the ‘Service Principal’ handy from earlier;
- Tenant ID
- Application (Client ID)
- Object ID
- Secret
Ansible
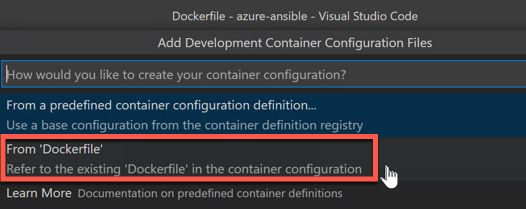
Create an Ansible Docker Container in VSCode
Now we are at a point where we can start to look at what we need to do next to create our Ansible environment. The first thing we need to do is create a ‘dockerfile’ which has the ansible software installed that we need to deploy to Azure. So, let’s do that.
VSCode Extensions
We also need some extensions for VSCode, but only a couple! Load VSCode and find and install these.
- Docker
- Remote - Containers
These let us visually see that our dockerfile is correct and the ‘Remote - Containers’ extension lets us run a VSCode environment in a remote container, which lets us run ansible playbooks in that container. But, more to come on that. Next, we need a dockerfile.
Create our Ansible Dockerfile
You will have to take this file on a certain amount of faith, but the code is well documented. If you have never used Docker before, just know that this file creates a base container from a debian image, installs a bunch of stuff and then we can use this as a place to run ansible from, on a Windows machine.
So, create a new folder on your Windows machine and open it in VSCode using the ‘Open Folder’ option. Create a file called ‘Dockerfile’ (no extension) and copy/paste this code.
# This is the latest Version of Python which is install to a Debian 'Buster' Image
FROM python:3.9.1-buster

# Get any new security and package updates
RUN apt-get update && apt-get upgrade

# Install Ansible
RUN pip install ansible==2.10.5

# Install the Azure Ansible Modules. First the required prereqs, then the actual modules
RUN curl -sL https://raw.githubusercontent.com/ansible-collections/azure/v1.3.1/requirements-azure.txt --output ./requirements.txt && \
    pip install -r ./requirements.txt && \
    ansible-galaxy collection install azure.azcollection:1.3.1
Create an Ansible Docker Container in VSCode
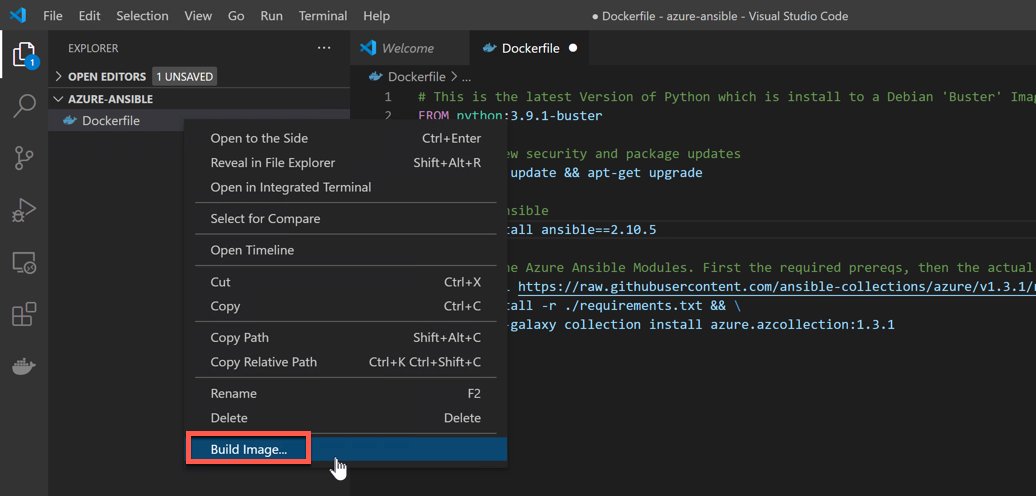
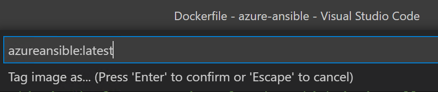
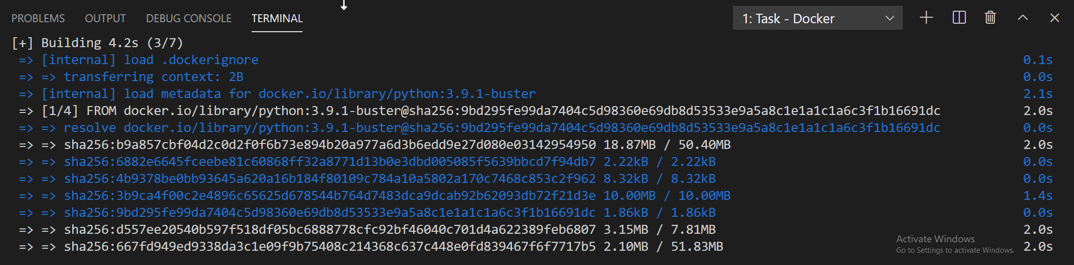
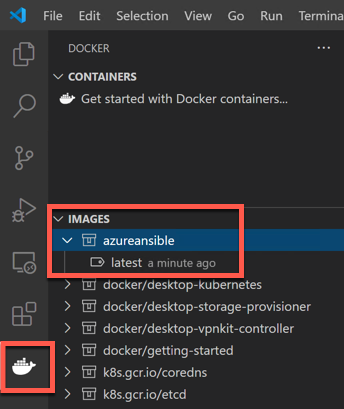
Now, right click the file and choose ‘Build Image’. If Docker is setup correctly it will happily build this for us. Give it a name (default is fine) and watch the build occur. It will take a couple of minutes. Note that we have an Image in our docker images list afterwards.
Run a Remote Container VSCode Instance
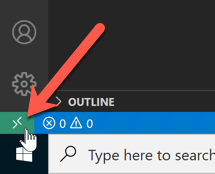
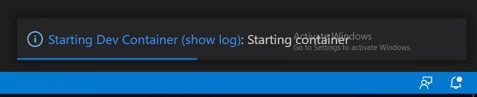
Now the fun part. Click the little green >< icon on the bottom left of VSCode and at the top of the screen choose ‘Remote-Containers: Reopen in Container’
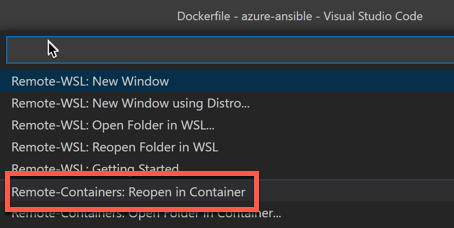
Then we tell it want to use our Dockerfile as the remote container instance
Wait a few seconds…
Boom! Bring up a terminal if it isn’t there (CTRL-') and run a few commands. We have ansible installed and are running from our container which is a different machine effectively.
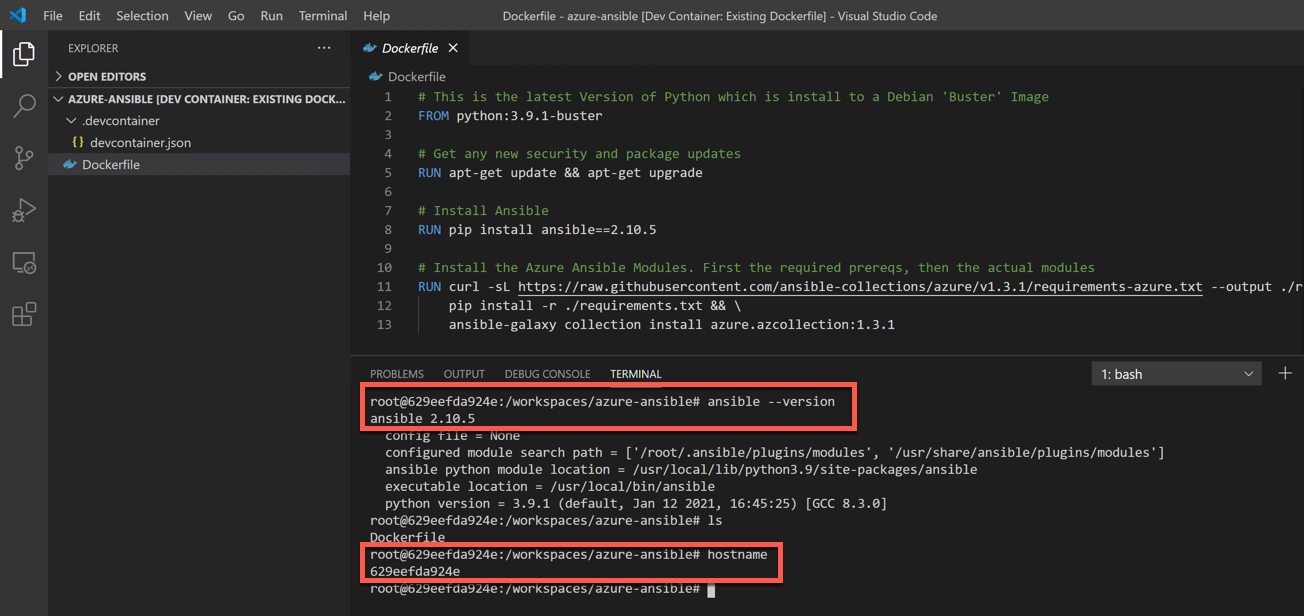
Note that this also maps the files from our work folder into this container and so we can see/work with those here. This is where the magic happens as we can develop on Windows but use a linux container backend. Very nice.
Create an Ansible Role Playbook
We can now create an ansible playbook. A playbook is simply the steps we want ansible to carry out. We will create two ‘roles’ inside this, one to create the VM (infrastructure) and the other to connect to it and configure it (configuration).
I do have a zip of the code on GitHub here but I would definitely encourage trying it out yourself first
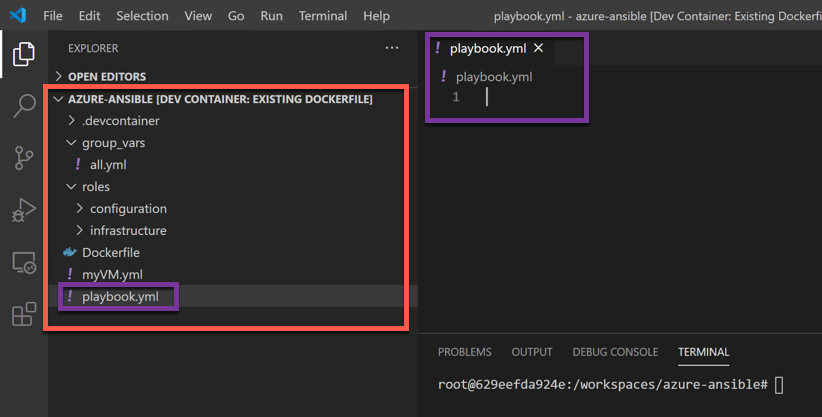
In our working folder, create the following folders and empty files.
mkdir group_vars && touch group_vars/all.yml
mkdir roles
touch myVM.yml
touch playbook.yml
Then, cd into the roles folder and create our two roles by running these commands;
cd roles

ansible-galaxy init infrastructure
- Role infrastructure was created successfully

ansible-galaxy init configuration
- Role configuration was created successfully
The structure should be like this. I’ve removed the role folders/files for brevity, but it will make a lot of items.
.
├── Dockerfile
├── group_vars
│   └── all.yml
├── myVM.yml
├── playbook.yml
└── roles
    ├── configuration
    │   ├── README.md
    │   ├── ...
    └── infrastructure
        ├── README.md
        ├── ...

20 directories, 20 files
And note this is reflected in our VSCode, perfect. We can edit them directly from it.
Basic Playbook Setup
Let’s start simply and try to have ansible create a resource group in Azure for us.
playbook.yml
In playbook.yml file. Add this;
- name: "Provision Azure infrastructure" # Just a name for our own use really
  hosts: localhost # Run this item from our 'local' machine
  pre_tasks: # We want to load in our variables to customise the run
      - name: Load our variables
        include_vars: "{{ env }}" # A variable file to load, which we tell ansible at run time
  roles:
      - infrastructure # The role we want to run
/group_vars/all.yml
Then, in /group_vars/all.yml, which will store default values for us, including our azure vars we will pass at runtime, add this;
# Turn our passed env variables into something ansible can use to talk to azure
client_id: "{{ lookup('env','AZURE_CLIENT_ID') }}"
secret: "{{ lookup('env','AZURE_SECRET') }}"
tenant_id: "{{ lookup('env','AZURE_TENANT') }}"
azure_clients_object_id: "{{ lookup('env','AZURE_CLIENTS_OBJECT_ID') }}" #TEMP - should figure this out at runtime

# Where to deploy our resources by default
location: "northeurope"
/roles/infrastructure/tasks/main.yml
Then, in /roles/infrastructure/tasks/main.yml, add this to tell it to run another set of tasks we will create next;
---
# tasks file for infrastructure

- name: Resource Group tasks
  include_tasks: resource-group.yml
As we are asking it to run tasks in another file, create this beside main.yml and call it resource-group.yml and paste in this. It looks worse than it is. Notice the items in brackets, these are variables and ansible will fill in these values for us later based on what we pass in. This also our first ‘Azure’ resource creation item. Check the docs here for more info on it and what else we could specify etc…
- name: Create Resource Group
  azure.azcollection.azure_rm_resourcegroup:
      subscription_id: "{{ subscription_id }}"
      client_id: "{{ client_id }}"
      secret: "{{ secret }}"
      tenant: "{{ tenant_id }}"
      location: "{{ location }}"
      name: "{{ resource_group_name }}"
myVM.yml
And finally, add this to myVM.yml. This is a config file of sorts we can use to represent an environment we want to deploy. We can create lots of these, one for each VM we want. One thing we do need to put in is our azure subscription_id as this is currently referenced in the resource-group.yml file and will be used in all azure resource declarations we make, so we define it here to keep things flexible later in case want to deploy this to another subscription later for example. Grab yours from the azure portal.
subscription_id: "put-in-your-subscription-id-here"
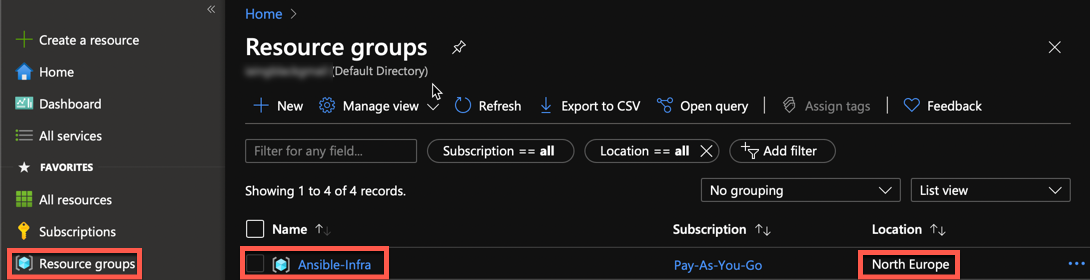
resource_group_name: "Ansible-Infra"
vm_name: "iainsansiblevm"
Deployment
Now, we need to run it. First, we export our azure details from earlier to the bash shell so ansible can read them. Put in your Service Principal details from earlier and run this in the VSCode terminal;
export AZURE_TENANT=faa9681f-25c0-459c-95c2-b45a98e87sc3
export AZURE_CLIENT_ID=e6f23ac2-e1ff-4abf-918e-c3a7f756a13a
export AZURE_CLIENTS_OBJECT_ID=654f57d9-68e5-42ab-87d6-9c8c106412f2
export AZURE_SECRET=put-your-secret-here-oh-and-never-in-git!
And then we run our playbook…
ansible-playbook playbook.yml -e env=myVM.yml
Success!!!
root@629eefda924e:/workspaces/azure-ansible# ansible-playbook playbook.yml -e env=myVM.yml
[WARNING]: No inventory was parsed, only implicit localhost is available
[WARNING]: provided hosts list is empty, only localhost is available. Note that the implicit localhost does not match 'all'

PLAY [Provision Azure infrastructure] ***********************************************************************************************************

TASK [Gathering Facts] **************************************************************************************************************************
ok: [localhost]

TASK [Load our variables] ***********************************************************************************************************************
ok: [localhost]

TASK [infrastructure : Resource Group tasks] ****************************************************************************************************
included: /workspaces/azure-ansible/roles/infrastructure/tasks/resource-group.yml for localhost

TASK [infrastructure : Create Resource Group] ***************************************************************************************************
changed: [localhost]

PLAY RECAP **************************************************************************************************************************************
localhost                  : ok=4    changed=1    unreachable=0    failed=0    skipped=0    rescued=0    ignored=0

root@629eefda924e:/workspaces/azure-ansible#
It’s in azure too!
This seems a good point to stop at. In the next post we’ll create a whole VM and configure it.